
AirClip User Guide
Record short audio clips from what is playing on your Windows PC.
Quick Start
AirClip is listening to the selected audio source and ready to record.
A clip is being written to the output folder.
Open the log file for details about audio device or config problems.
- Start AirClip. It appears in the Windows system tray.
- Play audio in your music app, browser, media player, or stream.
- Left-click the tray icon to open the Mini Deck, then click Rec — or right-click the tray icon and choose Record Now, or press
Ctrl+Shift+R. - Click Stop in the Mini Deck, choose Stop from the tray menu, or press
Ctrl+Shift+Ragain. - AirClip saves the clip in the configured recordings folder and opens it.
By default, AirClip uses Driverless Loopback. That means it records the selected Windows playback device: if you can hear it through that device, AirClip can record it.
New installs start with a 10-day free Pro trial. All Pro features are available immediately — no account or payment required. The Mini Deck title bar shows AirClip Trial while the trial is active. A reminder appears 3 days before expiry. After the trial, AirClip continues as AirClip Free.
Manual Recording is available in Free mode with MP3 or CD-quality WAV output. Snap-Back, One-Shot, Automatic Recording, Microphone Mixing, and DVR Scheduler require AirClip Pro. To upgrade after the trial, select Help > Buy AirClip Pro from the tray menu. The purchase page opens with your machine pre-registered. After completing the purchase, import the license.airclip file received by email using Help > Import License.
When the trial ends, AirClip switches to Free while it is running; no restart is required. Pro-only controls become unavailable, but MP3 and CD-quality WAV remain available. Your selected MP3 or CD-quality WAV setting is retained; obsolete quality settings default to MP3. A recording already underway finishes with its current settings, including WAV if selected; the Free recording settings take effect after that recording stops.
The trial-expired notification appears only once for that trial, even after restarting AirClip. Normal recording and error notifications remain available. If notifications are disabled when the trial expires, the expiry notice can appear once after notifications are enabled.
Recording Modes
| Type | Mode | Default hotkey | What it does |
|---|---|---|---|
| Live | Manual Recording | Ctrl+Shift+R |
Starts recording immediately. Press again or click Stop to finish. |
| Live | Snap-Back Recording Pro | Ctrl+Shift+S |
Starts a clip that already includes the previous configured seconds of audio, then continues recording live until you stop it. |
| Auto | One-Shot Recording Pro | Ctrl+Shift+O |
Arms AirClip once. It waits for audio above the start threshold, records one clip, stops after silence, then returns to Monitoring. |
| Auto | Automatic Recording Pro | Ctrl+Shift+A |
Continuously watches for audio. Creates clips whenever audio starts and stops each clip after silence. Stays armed until you disable it. |
Live Recording means the user starts and stops recording while listening. Live recordings can also be paused and resumed. Auto Recording means AirClip uses silence detection to decide when clips begin or end.
When any recording mode is active, other incompatible modes are disabled in the Mini Deck and tray menu until the active mode stops.
Snap-Back Recording Pro
Snap-Back is for moments you notice late. AirClip keeps a short listening window in memory while monitoring. When you trigger Snap-Back Recording, the saved clip starts with previously buffered audio and continues recording live until you stop it.
The default snap-back duration is 30 seconds. You can change it to 10, 15, 30, or 60 seconds from the snap-back submenu in the tray, or from Live Recording Settings. The maximum is 60 seconds.
Microphone Mixing Pro
When a microphone is enabled in Audio Input Settings, the Mic button appears in the Mini Deck. The microphone signal is mixed into the recording alongside the system audio, making it useful for voiceover, commentary, karaoke, calls, and gaming narration.
- Right-click Mic to open the Voice Level popup and adjust microphone gain from –24 to +24 dB without stopping any active recording.
- Left-click Mic when idle to toggle the microphone source on or off. Changing the source while idle applies immediately.
- Left-click Mic while recording to mute or unmute the microphone live. The clip continues uninterrupted — only the mic signal is silenced.
- If the microphone is off when recording starts, the Mic button is disabled for the duration of that clip.
Mini Deck
Left-click the AirClip tray icon to open the Mini Deck. It is a small floating control window with all recording controls in one place. You can leave it open while you work or close it — it hides rather than exits.
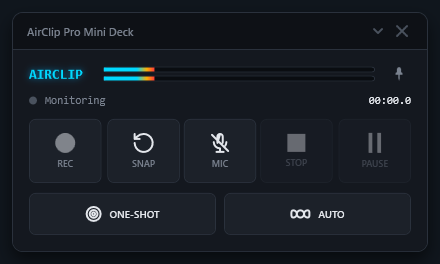
Controls
- Rec — starts Manual Recording.
- Snap Pro — triggers Snap-Back Recording using the current snap-back duration.
- Mic Pro — toggles the microphone on or off. Right-click to open a Voice Level slider (–24 to +24 dB). During a recording, left-click mutes or unmutes the mic live without stopping the clip.
- Stop — stops whatever recording mode is currently active.
- Pause / Resume — pauses or resumes a live Manual or Snap-Back recording.
- One-Shot Pro — arms One-Shot Auto Recording.
- Auto Pro — arms or disarms Automatic Recording.
Button states
The active recording mode button lights up with its mode color and stays highlighted while that mode is running. The Rec button also lights up during Snap-Back and One-Shot recording, because audio is actively being written. Disabled buttons are grayed out while an incompatible mode is active.
Status line
The status label below the title shows what AirClip is currently doing: Monitoring, Live recording, Snap-back recording, One-shot waiting, One-shot recording, Auto armed, Recording paused, or Error.
Title bar
The Mini Deck title bar shows your current edition: AirClip Free — Mini Deck, AirClip Trial — Mini Deck, or AirClip Pro — Mini Deck. The same edition label appears in the tray menu status header.
Pin button
Click the Pin button to keep the Mini Deck above other windows. This setting is saved and restored across sessions. You can also set it from Settings > App > Mini Deck stay on top.
Position and state persistence
When you close the Mini Deck, its position and Pin state are held in memory. They are written to the config file the next time AirClip returns to Monitoring (idle). This avoids triggering a config reload while a recording is in progress.
Tooltips
Hover over any Mini Deck button to see a tooltip showing the action and its current hotkey. Tooltips can be disabled from Settings > App > Disable Mini Deck tooltips.
Tray Menu
Right-click the AirClip tray icon to open the tray menu. It is organized into sections:
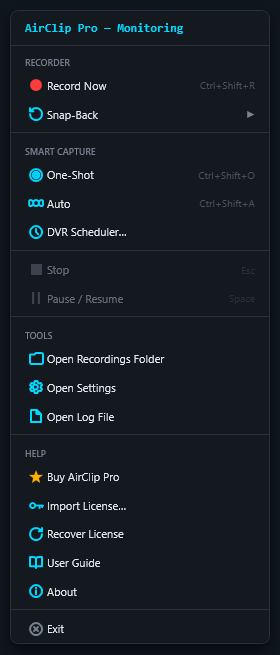
- Status header — shows your current edition and AirClip state, for example AirClip Pro — Monitoring or AirClip Trial — Recording.
- Live recording section — Record Now and the Snap-Back submenu.
- Stop / Pause / Resume — appears when a live recording is active.
- Smart Capture section — One-Shot, Auto mode, and DVR Scheduler.
- Mini Deck — opens the Mini Deck floating window.
- Configuration — submenu with Open Settings and Open Log File.
- Tools — Audio Trimmer, a separate window for trimming saved MP3/WAV files.
- Help — Buy AirClip Pro, Import License, Recover License, License Status, User Guide, and About.
- Exit.
Quiet update notices
When a newer stable release is available, a small cyan icon appears in the Mini Deck title bar. Hover for Update available; click to open the update panel. The tray Help menu mirrors its status. No balloons or windows open automatically, and updates are available in both Free and Pro.
Choose Download to fetch the installer. Progress appears in the panel and the icon tooltip; you can cancel or close the panel without stopping recording. After verification, the tooltip becomes Update ready to install. Choose Install update and confirm to close AirClip and open the interactive installer. Recordings, saved settings, license and DVR schedules are preserved. Stop armed/active capture and close Audio Trimmer first; installation is blocked around upcoming DVR starts. Windows security prompts may still appear.
AirClip checks quietly shortly after startup and then daily. If a check fails, including on an air-gapped computer, automatic checks stop for that session. Open Help > About > Check for updates to retry when desired; status appears in About, and a successful manual check restores daily checking. When a newer release is available, choose View update to open its download/install panel. Missing update information before the first published manifest is handled quietly.
Snap-Back submenu
The Snap-Back entry in the tray menu has a submenu with duration choices: Last 10s, Last 15s, Last 30s (Default), and Last 60s. Choosing a duration immediately updates the INI setting, applies it to the buffer, and triggers a snap-back recording with the new duration. The currently active duration is shown with a check mark.
Help menu
- Buy AirClip Pro — opens the purchase page with your Machine ID pre-loaded. Licenses issued through this path are tied to this computer. After purchase, activate with Help > Import License.
- Import License — opens a file dialog to select your license file after purchase. The dialog accepts both
.airclipand.jsonlicense files. AirClip verifies the license and activates Pro immediately. You can also import by dragging the file directly onto the Mini Deck window (including from an email attachment), or by double-clicking it in File Explorer or on the desktop. - Recover License — opens the license recovery page with your Machine ID pre-loaded. Use this to re-request your
license.airclipfile if you have lost it or moved to a new computer. - License Status — shows whether Free or Pro is active, who the license is issued to, and the expiry date if applicable.
- User Guide — opens the guide matching this installer build. RC builds use their preview resources until promotion; released builds retain their versioned guide and screenshots. If matching resources are unavailable, AirClip opens the standard stable guide.
- Update status — appears only when a newer release is available and mirrors available, downloading or ready-to-install status. Opens the download/install panel.
- About — shows the AirClip version and offers Check for updates.
Audio Trimmer Pro
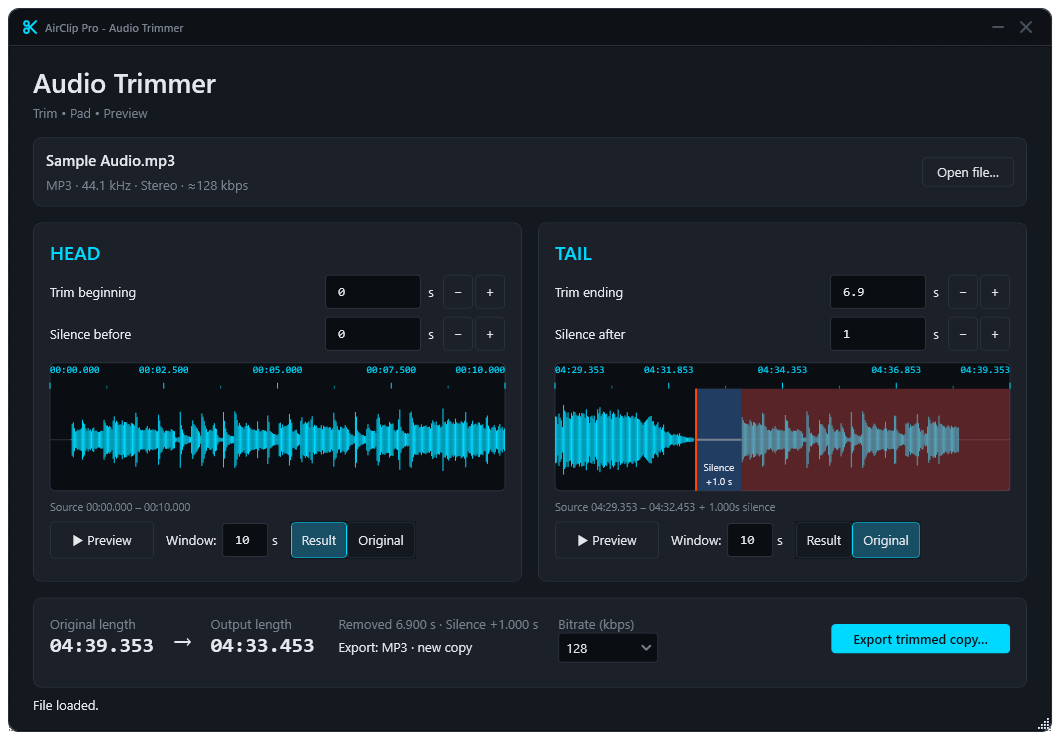
TAIL in Original view: red marks removed audio; blue shows 1 second of added silence immediately after the cut. HEAD shows the Result view.
Each sample window defaults to 10 seconds and has a 60-second maximum. Added silence defaults to zero and has a separate 60-second maximum at each end. Invalid or excessive values are highlighted with a message; correct them to resume playback/export.
Each sample defaults to Result: cyan retained audio directly beside gray added silence, labeled with its duration. The cursor moves continuously through that playback result. Select Original for the source-window comparison: red marks removed audio, and blue silence overlays the corresponding time interval immediately before the start cut or after the end cut. A 6.9-second end trim with 1 second of silence shows blue over the first second of the removed region, not after the original end. The axis extends only if padding goes beyond the original window. Changing views does not change playback or export; the cursor follows the same timeline as the overlay.
The tray menu item is greyed out in Free or after trial expiry. Direct launch still allows Free users to open and preview files, but not save cleaned copies.
Remove unwanted audio from either end of a completed MP3 or WAV, such as a repeated intro captured from looping playback. Open Tools > Audio Trimmer from the tray menu. Cleanup runs independently: closing it does not stop the recorder, and closing the recorder does not close Cleanup.
- Choose Open file or drop one MP3/WAV onto the window.
- Enter seconds to remove from the beginning and end. Fractional seconds such as 0.25 or 3.75 are supported; the trims must leave some audio.
- Optionally set Add silence before (s) or Add silence after (s) in its sample group. Each defaults to zero and accepts fractional values up to 60 seconds. Trimming happens first, then silence is added around the retained audio; existing silence is not removed automatically or counted toward the added amount. The footer's Output: duration includes both pads. Playback includes the padding on that sample's end: gray flat sections represent added silence, and the cursor shows elapsed added silence while traversing them.
- Use Preview inside the HEAD (start) or TAIL (end) card. Click the active button again (now labeled Stop) to stop, or click the other button to switch samples. Both waveform views play the edited result. Result shows retained audio plus silence with an elapsed-sample ruler; Original shows source time, removed audio in red, and added silence in blue at the cut. A white cursor labels source audio time or elapsed silence. Hover over either waveform for explanation and format limitations. Each card has an independently adjustable Window, defaulting to 10 seconds. Direct fractional entry remains available; the trim and silence buttons adjust by 0.1 seconds. The output summary shows original and output lengths, total removed audio and added silence; status is below it. Cards stack and the workspace scrolls on narrow screens. Playback covers the part of the original window that remains after trimming: a 5-second end trim plays from original end minus 10 seconds to original end minus 5 seconds. Increase the window if your trim removes the whole sample.
- For MP3, export bitrate defaults to the source bitrate (VBR sources use their average mapped to a supported bitrate). Choose Export trimmed copy and an output filename. The source format is preserved; no format conversion is offered. The original cannot be overwritten. Replacing an existing output requires confirmation; cancellation or a failed export leaves that output unchanged.
Saving requires Pro or an active Pro trial; Free can open and preview audio. If a trial expires while Cleanup is open, export becomes unavailable. An export whose trial expires before completion is not published. You can cancel an export; closing during export asks for confirmation.
Cleanup preview temporarily pauses manually armed Auto and restores it after playback stops, provided the recorder state and entitlement have not changed. New recording/DVR requests stop preview first; Stop, sleep or license changes prevent stale Auto restoration. Preview is unavailable during active recording, armed One-Shot, or a DVR-owned session. Cleanup does not pause scheduled DVR sessions. Ordinary playback outside Cleanup still requires you to manage Auto yourself.
File dropping: Windows blocks Explorer drops into an app running as administrator. Launch AirClip normally, without elevation. The developer build launcher uses the desktop shell when invoked from an administrator terminal.
Only one Cleanup window is opened. Reopening brings it forward; an incoming filename asks before replacing existing trim settings. Advanced users can launch AirClip.exe --audio-cleanup "C:\\path\\clip.mp3" directly, even without the recorder running. Cleanup diagnostics are written to AirClip.cleanup.log in the AirClip data folder. Close Cleanup before release installer builds or recorder RC scripts. The developer build-test script automatically force-stops both recorder and Cleanup, interrupting any active recording/export or unsaved trim settings.
DVR Scheduler Pro
Set AirClip to record your morning show every day at 7 am. It just happens — like a DVR. Open Smart Capture > DVR Scheduler... from the tray menu to manage your scheduled recordings.
The DVR Scheduler uses Windows Task Scheduler under the hood so schedules fire reliably even if AirClip is not already running. Tasks are created in a dedicated Task Scheduler Library\AirClip\ folder and are visible in Windows Task Scheduler if you need to inspect them.
Schedule list
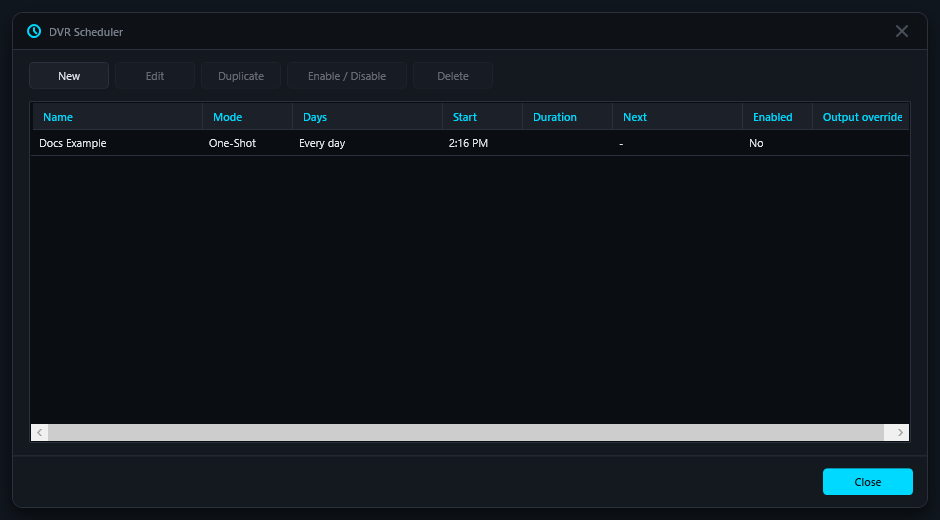
The scheduler window shows all your saved schedules with their mode, days, start time, next scheduled run, and enabled state. Double-click any schedule to edit it. Toolbar buttons let you create new schedules, edit, duplicate, enable/disable, or delete the selected schedule.
Creating a schedule
Click New and fill in the schedule dialog:
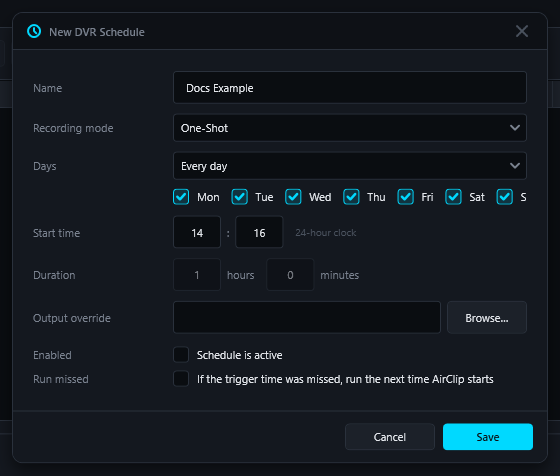
- Name — a unique label for the schedule, such as "Morning Show" or "Tuesday Stream".
- Recording mode — One-Shot or Auto.
- One-Shot: AirClip arms at the scheduled time, waits for audio above the silence threshold, records one clip, then stops when silence is detected.
- Auto: AirClip arms Auto Recording at the start time and records continuously until the scheduled stop time.
- Days — Every day, Weekdays, Weekends, or Custom (individual day checkboxes).
- Start time — the time of day the schedule fires.
- Duration — How long to record (hours and minutes).
- Auto: required. AirClip records for exactly this duration and then stops.
- One-Shot: optional hard-stop fallback. If a show never goes fully silent, AirClip will force-stop at this duration just as if silence had been detected. Leave blank to let silence detection run indefinitely (up to the four-hour safety cap).
- Output override — optional folder to save recordings from this schedule instead of the global output folder. Leave blank to use the default.
- Enabled — uncheck to keep the schedule saved but not active.
- Run missed — if checked and the machine was off or AirClip could not run at the scheduled time, Windows Task Scheduler will attempt to run the schedule as soon as possible after the machine wakes.
- Stream URL — optional URL to open in your browser when the schedule fires. AirClip opens the page in a dedicated browser profile so the stream can start playing automatically when the recording begins. The Detect button beside this field is enabled after you enter a URL and can automatically test the page for autoplay or Play button candidates. Leave blank if you start the stream manually.
Getting the right URL from a streaming directory: On sites like TuneIn, clicking a station graphic or name starts playback but does not give you the station's page URL. Instead, right-click the station name or logo and choose Copy link, then paste it into your browser address bar to confirm it loads the player page. That address bar URL is what goes in this field. The same applies to most streaming directories — navigate to the station's own page first, then copy the URL. - Play button / wait — optional. Click Detect (next to the Stream URL field) to let AirClip automatically discover whether the station autoplays or identify the correct play button selector. Only fill this in manually if Detect is unavailable (Firefox) or returns no candidates. See Configuring stream playback below.
- Close browser on stop — if checked, AirClip closes the browser window automatically when the recording ends.
How the Stream URL works
When a Stream URL is set, AirClip opens the page in a dedicated browser profile separate from your everyday browser session. This dedicated profile launches with the browser's autoplay policy relaxed, so stations that have autoplay configured in their player will start playing as soon as the page loads — no button click needed.
The first time a schedule with a Stream URL fires, your browser may briefly show a sign-in or profile prompt from the new profile. Dismiss it once and it will not appear again.
Both One-Shot and Auto schedules support Stream URL. For Auto, the browser opens at the start time and (if Close browser on stop is enabled) closes when the stop task fires at the end of the duration.
Browser compatibility
The level of automation AirClip can provide depends on your default browser:
| Browser | Autoplay | Play button click | Close on stop |
|---|---|---|---|
| Chrome, Edge, Brave, Vivaldi, Opera (Chromium-based) | ✓ | ✓ | ✓ |
| Firefox, Waterfox, LibreWolf | ✗ | ✗ | ✓ |
| Browser not detected | ✗ | ✗ | ✗ |
For Chromium-based browsers, AirClip launches a dedicated browser profile with autoplay enabled and a remote debugging connection for CSS selector clicks. For Firefox-family browsers, AirClip can still open the URL and close the window when recording stops, but the page will not autoplay and Play button clicks are not available — you would need a direct stream URL (MP3/AAC link) that starts playing on its own, or schedule the stream to already be running before the task fires.
Configuring stream playback
Stations either start playing automatically when the page loads (autoplay) or require a button click. The Detect button in the schedule editor handles both cases for you automatically. Detection works reliably for the most common player types. For unusual sites it may not find a play button — in those cases an opt-in submission option appears so the support team can analyse the site and improve detection in a future build. No data is sent without your review.
Using the Detect button (recommended)
- Enter your station URL in the Stream URL field.
- Click Detect. AirClip opens the page in the AirClip browser, waits for it to load, then runs an automated probe.
- Results appear inline below the field:
- Autoplay detected — the station starts playing on its own. The Play button field is cleared automatically. You are done.
- Candidates found — autoplay was not detected. AirClip lists the play button elements it found. Click the most likely one to fill the Play button field. Verify playback in the browser window that briefly appeared.
- No candidates found — increase the wait sec value (the page may load slowly) and try again, or use the manual DevTools method below. A Submit URL to support for analysis button also appears — clicking it opens your email client with a pre-composed message you can review and send. This is opt-in; nothing is sent automatically. The AirClip team will review the site and aim to improve detection in a future build.
Manual fallback — if Detect fails or you use Firefox
To check for autoplay manually: open the station URL in an InPrivate / Incognito window and wait 5–10 seconds without clicking. If audio starts, the station autoplays — leave the Play button field blank. If nothing happens, the station requires a click.
To find the CSS selector manually:
- Open the station URL in Chrome or Edge.
- Right-click the Play button and choose Inspect (or press F12 and use the element picker).
- Note the
idorclassof the highlighted element:id="button-play"→ enter#button-playclass="play"→ enter.playclass="play-btn large"→ enter.play-btn(first class only)
- To verify, open the Console tab and run
document.querySelector('.play')— a non-null result confirms the selector is correct.
Finding a direct stream URL
A direct stream URL is a raw audio link ending in .mp3, .aac, .m3u8, or similar. When used as the Stream URL, the browser opens the audio file directly — it starts playing immediately in any browser, with no autoplay policy or Play button needed. This is the most reliable option for DVR scheduling.
Here are the most practical ways to find one:
Method 1 — Browser Network tab (works on any site)
- Open the station's player page in Chrome or Edge.
- Press F12 to open developer tools, then click the Network tab.
- Click the Play button on the station's player to start the stream.
- In the Network tab, click the Type column header to sort by type, or type
mediain the filter box. - Look for a request with type
media,fetch, orxhrwith a URL containing.mp3,.aac,.m3u8,.ogg, or a path like/stream,/live, or/radio. - Right-click that request and choose Copy > Copy URL.
- Paste the URL into your browser address bar and confirm audio plays. If it does, that is your direct stream URL.
.m3u8) streams. These work in most browsers but may not play directly in AirClip's loopback capture if the browser plays them silently in a background tab. Test first to confirm audio comes through your playback device.
Method 2 — Radio Browser directory
radio-browser.info is a free, community-maintained database of internet radio stations. Many entries include a direct stream URL.
- Go to www.radio-browser.info and search for your station by name or call letters.
- Click the station name. The station detail page shows the stream URL.
- Copy the URL and test it in your browser address bar — audio should start immediately.
Method 3 — VLC media player
If you already use VLC:
- In VLC, choose Media > Open Network Stream and paste the station's player page URL.
- Once playing, choose Tools > Media Information (or press Ctrl+I).
- The Location field on the General tab shows the resolved direct stream URL that VLC is actually playing.
- Copy that URL and use it as the Stream URL in AirClip.
Method 4 — Check the station's own website
Many stations publish direct stream links under pages titled Listen Online, Apps & Streams, How to Listen, or Tune In. Look for links to .pls or .m3u playlist files — these are small text files that contain the direct stream URL inside. Download the file, open it with Notepad, and copy the URL after File1=.
Method 5 — Web search
Search for: "[station name]" direct stream url mp3 or "[station call letters]" stream url. Radio enthusiast sites and community forums often share working direct stream URLs for popular stations.
Runtime Status
The Runtime tab in Settings shows what AirClip is currently using, including the active capture device, capture format, monitor device, microphone device, config file path, and last measured signal level.
Select Email log to support to prepare an email to [email protected] with a copy of the current log attached. AirClip tries classic Outlook first, then the default mail client. Review the log and describe the issue before sending. If your mail client cannot accept the attachment automatically, AirClip offers to open an email and show the log file for manual attachment.
Audio Input Settings
Open Configuration > Open Settings > Audio Input to choose what AirClip records from.
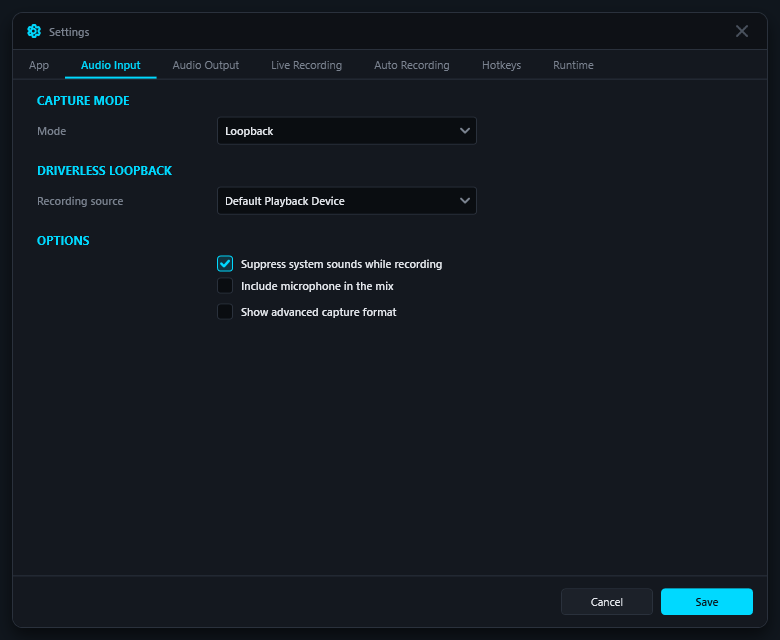
Capture Mode
- Loopback: records audio already playing through a Windows playback device. This is the normal driverless mode.
- VBCable Pro: records from a VB-CABLE recording device. This is advanced routing for cleaner app-specific capture.
Recording Source
In Loopback mode, choose Default Playback Device for normal record-what-you-hear behavior. You can also choose a specific playback device such as speakers, headphones, or a Bluetooth speaker.
Microphone Pro
Include microphone records the selected microphone into the same final clip as the playback audio. This is useful for voiceover, commentary, karaoke, tutorials, calls, and gaming narration.
- Microphone device: choose Default Microphone for the current Windows default input, or choose a specific microphone.
- Microphone gain dB: adjusts microphone level before it is mixed into the recording. Start at
0. Use a lower value if your voice distorts, or a higher value if it is too quiet.
VB-CABLE Routing Pro
VB-CABLE is optional advanced routing. Apps send audio to CABLE Input, and AirClip records from CABLE Output.
- VB-CABLE capture input: the recording endpoint AirClip captures from, usually
CABLE Output. - Monitor output: the speakers or headphones AirClip plays monitored audio to.
- Enable monitor: plays captured VB-CABLE audio through the monitor output.
- Monitor volume: monitor playback level from 0 to 100.
Capture Format
- Sample rate: capture sample rate in Hz. The default 48000 Hz is usually appropriate.
- Channels: number of channels. Stereo is
2. - Buffer milliseconds: audio buffer size. Smaller values reduce latency but may be less forgiving on busy systems.
Audio Output Settings
Open Configuration > Open Settings > Audio Output to control where and how clips are saved.
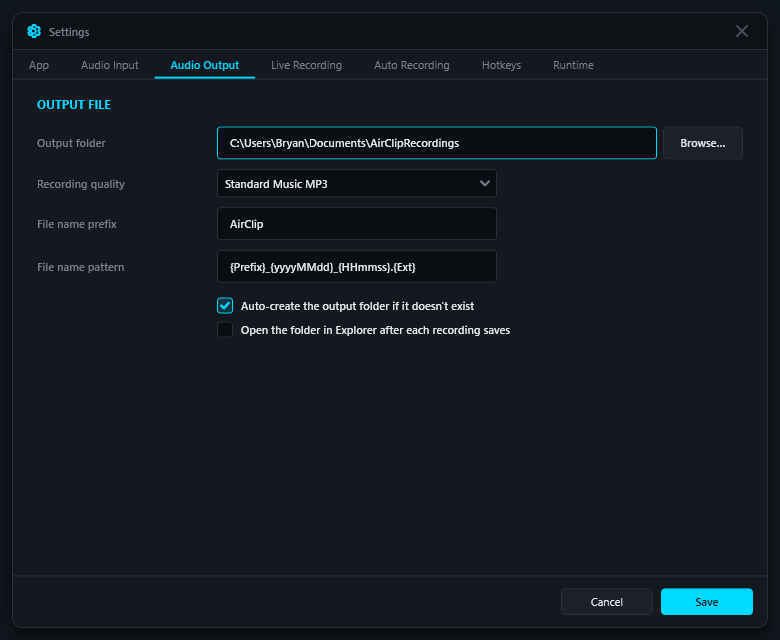
- Output folder: where recordings are saved. Use Browse to choose a folder.
- Recording quality: chooses the saved file type and size. MP3 is available in Free and Pro (128 kbps, 44.1 kHz stereo). CD-quality WAV is also available in Free and Pro and produces larger, uncompressed files. MP3 is the default for new installations.
- Prefix: first part of each filename.
- File name pattern: filename template. The default includes date, time, and
{Ext}so the extension follows the selected quality preset. - Auto-create folder: creates the output folder if it does not exist.
- Open folder after save: opens the recordings folder after a manual or one-shot recording finishes. Auto mode opens it once when auto mode is disabled.
Your audio quality preference is preserved when the trial ends. MP3 and CD-quality WAV remain available in Free, including when selecting and saving Settings. Older quality options, including Original WAV, default to MP3; choose CD-quality WAV explicitly if you prefer uncompressed output.
AirClip writes temporary conversion files under the Windows temp folder and only places the finished MP3 or WAV in your recordings folder.
Live Recording Settings
Open Configuration > Open Settings > Live Recording to control modes that are manually started and stopped while listening.
- Manual pre-roll milliseconds: includes a small amount of buffered audio at the moment you start manual recording. This helps the clip line up with the hotkey or button press rather than starting a fraction of a second late.
- Default Snap-Back seconds: how far back AirClip reaches when Snap-Back Recording starts. Choose from 10, 15, 30, or 60 seconds. The maximum is 60 seconds. This value can also be changed from the snap-back submenu in the tray, and the two are kept in sync.
Pause and Resume
During a Manual or Snap-Back recording, press the pause/resume hotkey (default Space) to pause writing audio. Press it again to resume writing to the same file. The tray icon flashes while a live recording is paused.
Auto Recording Settings
Open Configuration > Open Settings > Auto Recording. AirClip uses these silence detector settings to decide when audio has started and when quiet has lasted long enough to stop the clip.
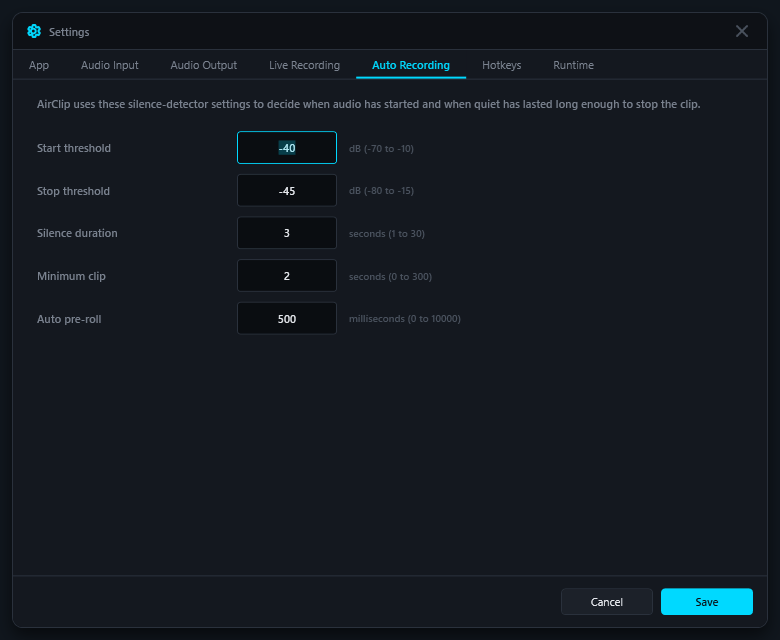
| Setting | Range | Meaning |
|---|---|---|
| Start threshold dB | -70 to -10 |
Recording starts when audio rises to or above this level. Less negative values require louder audio before recording begins. |
| Stop threshold dB | -80 to -15 |
Audio below this level is treated as silence for stopping purposes. Should be slightly lower than the start threshold. |
| Silence duration seconds | 1 to 30 |
How long audio must stay below the stop threshold before AirClip stops the current clip. |
| Minimum clip seconds | 0 to 300 |
Prevents very short false-trigger clips by requiring a minimum duration before an auto stop can finish a clip. |
| Auto pre-roll milliseconds | 0 to 10000 |
Includes audio just before the detector triggers, so the very beginning of a clip is not cut off. |
Suggested starting values: -40 dB start threshold, -45 dB stop threshold, 3 seconds silence duration, and 500 ms auto pre-roll. AirClip validates these values before saving; the stop threshold must stay at least 3 dB lower than the start threshold.
Hotkeys
Open Configuration > Open Settings > Hotkeys to change hotkeys. Enter hotkeys as combinations like Ctrl+Shift+R or single keys like Space.
- Manual record: default
Ctrl+Shift+R. - Pause/resume recording: default
Space. AirClip registers this hotkey only while a live Manual or Snap-Back recording is active, so it does not interfere with normal Space bar usage at other times. - Snap-back recording Pro: default
Ctrl+Shift+S. - Automatic recording Pro: default
Ctrl+Shift+A. - One-shot recording Pro: default
Ctrl+Shift+O.
If a hotkey is already used by another application, AirClip logs a warning and the tray menu and Mini Deck can still be used for that action.
App Settings
Open Configuration > Open Settings > App for general application preferences.
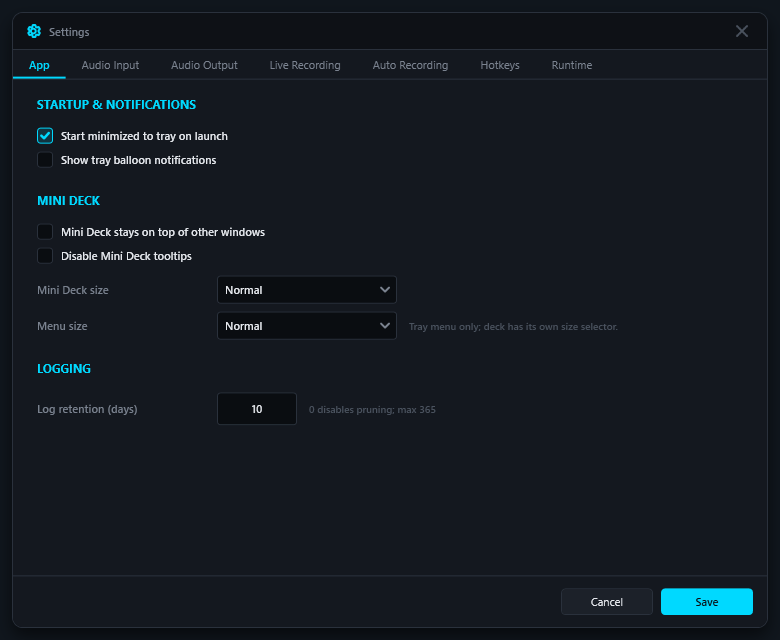
- Start minimized: AirClip starts in the tray without showing any window.
- Show notifications: shows tray balloon notifications when recording starts or stops. On by default so new users get clear visual feedback.
- Mini Deck stay on top: keeps the Mini Deck floating above other windows. This is the same as the Pin button inside the Mini Deck itself.
- Disable Mini Deck tooltips: turns off the hover tooltips on Mini Deck buttons. Useful if the tooltips interfere with your workflow.
- Menu size: chooses Compact, Normal, or Large tray menu spacing.
- Log retention days: AirClip removes log files older than this many days on startup. Set to
0to disable automatic pruning.
Notifications and System Sounds
Loopback mode records the Windows playback mix. That means Windows system sounds, notification sounds, volume slider sounds, and other apps can be captured if they play through the selected output device.
- Show notifications defaults on for helpful visual feedback. Turn it off if tray balloons become distracting.
- Suppress System sounds while recording temporarily sets Windows System sounds to 0% while AirClip is recording or armed, then restores the original level when done.
- For the cleanest loopback clips, keep notification-heavy apps quiet or enable Windows Do Not Disturb while recording.
VB-CABLE routing can provide cleaner capture because selected apps can be routed into the cable instead of recording the entire speaker mix.
Settings and Config
Use Configuration > Open Settings for normal configuration. Settings are stored in AirClip.ini. AirClip writes this file next to the executable when that folder is writable, or in %LOCALAPPDATA%\AirClip\ as a fallback.
When settings are saved, AirClip detects the change and automatically reloads the INI. If a recording is actively being written, the reload waits until the active recording stops before applying changes.
You can also edit AirClip.ini directly in a text editor. AirClip watches the file and automatically reloads changes without restarting.
Troubleshooting
Snap-Back produces nothing
If you trigger Snap-Back immediately after starting AirClip, the buffer may not have accumulated any audio yet. Wait a few seconds after startup before using Snap-Back. The buffer fills as long as AirClip is monitoring.
Tiny or empty recordings
- Confirm audio is actually playing through the selected recording source.
- Use Audio Input > Recording source > Default Playback Device for basic Loopback testing.
- Record for at least 5 to 10 seconds during testing.
- Open Configuration > Open Log File and check the active capture device and recording size.
No audio recorded
- Check that Windows is playing audio through the selected playback device.
- If using Bluetooth or changing outputs, restart AirClip or reselect the recording source in Settings.
- If using VB-CABLE, confirm the source app is routed to
CABLE Input.
Pro license not activating
- Use Help > Import License and select the
license.airclipfile received by email after purchase. - Check Help > License Status for details on what was detected.
- If you have lost the file, use Help > Recover License to have it re-sent to your purchase email.
- If License Status reports "bound to a different machine," the license was purchased on a different computer. A new license is required for this machine.
Windows blocks the app
AirClip release installers are signed. Windows SmartScreen or Smart App Control may still show a reputation warning for a new publisher or fresh download. Verify that the installer came from the AirClip website and that the publisher is Bryan Whitfield.
DVR schedule does not fire
- Open Windows Task Scheduler and look under
Task Scheduler Library\AirClip\to confirm the task exists and is enabled. - Check that Run missed is enabled if you need missed schedules to catch up after the machine was off.
- Verify AirClip Pro is active — DVR Scheduler requires a Pro license.
Find the log file
Use Configuration > Open Log File. The Runtime tab also shows the resolved runtime paths AirClip is using. Logs include startup details, selected audio devices, recording start/stop events, and errors.
Portable Install
AirClip can run from any folder containing AirClip.exe, but the installer is the recommended path for normal use. The setup helper installs AirClip for the current user under:
%LOCALAPPDATA%\Programs\AirClip
The AirClip installer copies the app, creates Start Menu shortcuts, and can optionally create a Startup shortcut so AirClip launches automatically when you log in.